ShopDreamUp AI ArtDreamUp

Deviation Actions
Mymy Old Artworks and MORE!
See all My-my Goodies! Character Artworks, sketches, commissions, and free to us bases!
$50/month


Suggested Collections


You Might Like…


Featured in Groups

Description
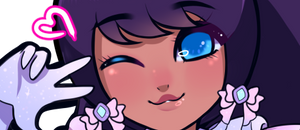
OK. I was bored. So I made this stupid step-by-step thingamajiggy...>> Haha, ENJOY~!?
-I use a tablet(duh)
-I don't use Photoshop, instead I use Corel Painter Essentials(ver.2 unfortunately)
-I color free-handedly meaning I don't use the Magic Wand Tool or that lasso tool(or w/e its called)
-For the line-art, I use size 1.8 Artistic Pastel Chalk other than Pencil
-FYI I hate green hair on characters, but this is an exception. >>
Step 1:
Basic outline using a light color, not black, on the canvas layer
Step 2:
On another layer(a more higher one), I use the size 1.8 blablabla for the line-art
Step 3:
In Layer 1(which is a layer above the canvas layer) I do the skin
Step 4:
After that is another seperate layer for the hair
Step 5:
A seperate layer for the eyes
Step 6:
I'M DONE~! Though on the layer with the line-art I lower the opacity so that the line-art doesn't appear too harsh and sticks out too much
And there's a whole bucnh of stuff in between like cleaning it up per layer and blablabla but I'm to lazy to say so. X333 Oh, and I have a seperate thing for the skin, too, which I'll post up after this...
Skin 'tutorial' [link] D=
Image size
436x2846px 816.88 KB
© 2007 - 2024 Sui-Sui
Comments16
Join the community to add your comment. Already a deviant? Log In
what did you use for the line art to come out so nice?